
Ask your ham radio friends what a Band Stacking Register is and you’re likely to get some blank stares. Others may pull out their smartphones and do an Internet search. The few who are really familiar with their HF rigs will tell you it’s a hidden feature that lets you shuffle within and between bands with little effort. It’s a kind of electronic scratch pad rather than conventional memory storage.
Common in many of today’s radios, band stacking first appeared in HF radios more than two decades ago. Various iterations can be found in rigs made by Icom, Yaesu, Kenwood, Ten-Tec, Elecraft, and others. For those who don’t need the luxury of 100 or more memories, band stacking is a simpler option.
The following is a brief overview of features and setup instructions. You can find more detailed information in your radio’s operating manual.
Strike Up the Band
So what is band stacking good for? This function is a convenient way to quickly recall three previously operated frequencies and modes on each band without going through a complicated list of steps. Think of them as bookmarks that let you move quickly between frequencies, bands, or both.
Let’s use the Icom IC-7300 as an example. Page 3-3 of the IC-7300 full manual explains that the band stacking register provides three memories for each band key to store frequencies, operating modes, and filter settings. This function is a convenient way to recall previously operated frequencies and modes on the selected band.
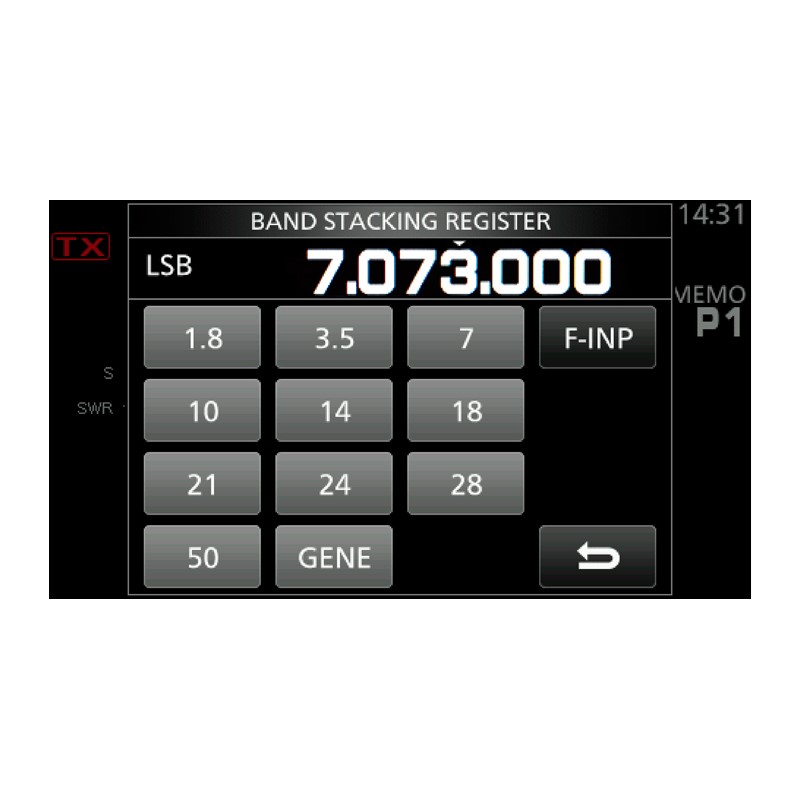
Here’s how it’s done. First, we’ll set it for a 40m FT-8 frequency, 7.073 MHz.
1. Set the frequency and mode you want and touch the MHz digits for one second on the main screen. This opens the band stacking register screen. You can also input the frequency from the band stacking register using the F-INP button.
2. Touch the corresponding band key.
3. The operating frequency and mode are now in the band stacking register.
One filled, two to go. You could use another memory setting to quickly move to the CW portion of 40m, and the last for a net like OMISS on 40m sideband. Exit the band stacking screen and you’re good to go. You can access your stored frequencies by returning to the band screen.
Helpful hint: If the mode seems to get stuck in USB/LSB-D, press the mode button on the screen, then select the data on the mode menu.
Yaesu radio owners will find similar features, but the newer touchscreen models store additional settings including band, mode, filters, and more. The process for the Yaesu FTdx-10 can be found on page 76 of the operating manual and is similar to the IC-7300. Start by pressing the band key, then select the band, mode, and other settings. Mode can be selected from the screen or a mode button on the front panel to the right of the VFO dial. Pressing the band key again will enter the information into the band stacking register.
Like the IC-7300, the FTdx-10 band stacking register will keep three items in its memory for each band. Scrolling though the entries can be done on the band screen or by using the band button. Previous data will be overwritten on a first in, first out basis to make room for new entries.
Memo Pad and QMB
In addition to band stacking, Icom and Yaesu radios have other options. Use Memo Pad and QMB (Quick Memory Bank) instead of relying on your own memory. Like band stacking, they’ll offer you convenience and, in some cases, more features. Consider them improved band stackers.
Icom Memo Pads are convenient when you want to temporarily store a frequency and operating mode. Examples include when you find a DX station in a pileup, or when a station you want to snag is rag-chewing and you want to temporarily search for others and return later. On the IC-7300, there are five Memo Pads plus one temporary pad. You can increase the number of memo pads to ten by changing a menu setting.
To save the screen settings (frequency, mode, filter), just press the MPAD button for a second. To retrieve, scroll by pressing the MPAD button. You can call up the entire list by pressing the menu button and touch MPAD on the screen.
Yaesu’s QMB is similar to the Icom Memo Pad but stores much more than just the frequency and mode. There are a total of 15 settings, including antenna, attenuator, DNR, and DSP notch filter. The current operation status can be stored in a dedicated memory channel by pressing the QMB button. A beep will confirm it is in the QMB.
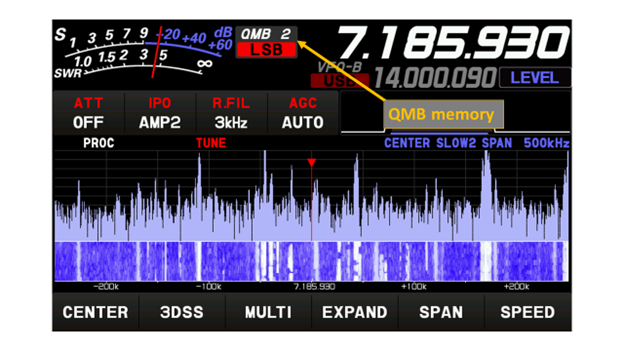
To add more, change to your next desired frequency and settings, then press QMB. When another is added, the first is bumped to position two and so on–first in, first out. Repeatedly pressing the QMB key will step through the stored QMB channels. The initial number is five QMB memories, but this can be increased to ten channels through the menu settings.
Doing some digging, I found that early versions of QMB appeared in the 1996 release of the FT-1000, with separate store and recall buttons, but with only five memories.
Why Use Them?
Every shortcut helps. Band stacking, MPAD, and QMB save the time you would have spent twiddling the VFO knob. Consider the following scenarios:
- Keep your eyes on the road. While operating mobile with an Icom IC-7000 or IC-7100, for example, you can change to a stored favorite frequency on any band just by pushing a band button on the hand microphone.
- Do you operate multiple modes in one band? You could store one for CW, one for digital, and one for sideband to quickly move through band segments.
- Have net frequencies at your fingertips–stack them on the bands where they operate.
- Band stacks remember just about everything–except where you left your glasses.