
After antennas, station grounding is probably the most discussed topic in amateur radio. It’s also the one having the most misconceptions—or is that myth-conceptions? One of the biggest myths: Ground is like a magic drain, diverting kilovolts from unwanted lightning and RF into the earth. Or maybe it goes through a secret portal to a black hole.
There’s no magic here. Grounding involves down-to-earth planning for the protection of your home electronics, ham station, and of course, you.
Deep Issues
It’s time to dig into the topic of grounding (or “earthing” as folks in the UK call it). There are three basic ground types that hams deal with at their stations:
- Grounding an antenna mast/tower (outside, lightning protection)
- Antenna ground plane (on/under antenna—think RF, radials)
- Safety ground (inside shack, shock hazard protection)
Obviously, your goal as a station builder is to make sure as little current as possible flows through anything in your station, like expensive transceivers or amps. Here are some practical techniques to improve your ham radio ground.
Clean or replace ground connections: Anything that’s exposed to the outdoors will eventually weather and corrode. Over time, corrosion can build up on the ground connections, impeding the flow of electrical current. You can slow down or even eliminate this problem.
If you notice corrosion on your ground connections, it is important to clean them thoroughly. Use a wire brush or sandpaper to remove the corrosion and ensure a clean, conductive surface. Treat them with corrosion inhibitors like Kearnalex Connector and Terminal Grease or Jet-Lube SS-30 Pure Copper Anti-Seize to improve conductivity. Replace worn clamps with new ones when necessary.
For a permanent solution, use ERICO Cadweld to connect wire to ground rods. It’s a clamp replacement that welds the connection by thermally fusing the wire to the ground rod. Once attached, it becomes a permanent, exothermic connection to a ground rod that will not loosen, corrode, or increase in resistance for the life of the installation. Cadweld works well with copper-bonded steel, galvanized, or stainless steel ground rods.
Add more ground rods: If you suspect the ground rod is not providing a sufficient low-resistance ground connection, you can add more. A second rod will decrease resistance about 40%. When using the typical 8-foot or 10-foot ground rods, you get the best results by spacing the rods at least 16 or 20 feet apart (2x grounded length), respectively. Use a single copper wire to connect all—6 AWG or thicker.
The top of the ground rod can (and should) be even with or below ground. To protect them and provide access for inspection, a 4-inch PVC cleanout can be a handy cover.
If you want to go the extra mile for performance, you can also tinker with the ground itself by adding a chemical treatment around the ground rod in a trench or pit. Over the years, amateurs have used various salts in combination with water to improve conductivity. It works but has some downsides, including rod corrosion and the need for regular maintenance.
The layered combination of powdered charcoal and salt (3 parts carbon/1 part salt) reduces the resistivity of soil around a ground rod. The ionic behavior of salt and charcoal helps to maintain moisture content around the earth pit, though it may require occasional watering.
GEM (Ground Enhancement Material) is another alternative. It is a low-resistance, non-corrosive, conductive carbon/Portland cement material that improves grounding effectiveness, especially in areas of poor conductivity such as rocky ground, mountaintops, and sandy soil. It can be installed in trenches or as a ground rod backfill. The material sets within three days and becomes a highly conductive concrete that doesn’t require maintenance and performs in all soil conditions.
Utilize ground plates: Sheets of copper or galvanized steel can be installed in shallow soil or rocky ground when a typical ground rod (8 to 10 feet) cannot be driven in. These large metal plates can be buried in the ground, horizontally or vertically, to provide a low-impedance ground connection. They can be particularly useful in areas with poor soil conductivity thanks to their large surface area.
Grounding straps: Grounding straps are flexible conductive materials used to establish a connection between different parts of your ham radio system. Use grounding straps to bond metal components together and create a solid ground.
Flexible solid copper straps will maintain a proper, low-impedance connection long after small-gauge wires and tinned copper braids have weathered and disintegrated. They’re used extensively for commercial equipment rooms, sheds, and tower installations for above-ground and underground connections to radiators, tower and ground rods.
Ensure proper bonding: Proper bonding of all metal components is essential for maintaining a good ground. Use heavy-gauge copper wire or copper straps to bond antennas, coaxial cables, and equipment to a common ground point known as a Single Point Ground Panel (SPGP). The SPGP is typically close to the ham shack to keep the ground connection as short as possible.
In addition, the electrical service entrance, telco, cable grounds and SPGP need to be bonded together. Sometimes these aren’t in close proximity, so you’ll need to run some ground wires. As you can see in the illustration, a perimeter ground is set up to connect these for better safety.
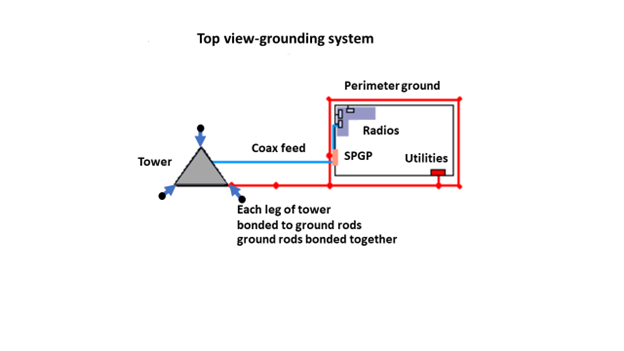
The perimeter ground helps conduct the surge energy around the building, minimizing the ground potential differences under the building during a lightning strike. The purpose is to minimize lightning currents that might flow through the structure. It also adds to the basic ground system by providing more connection points to the earth. The existing AC service entry ground is also connected.
One thing is very important—all equipment on the desk should be operated with the same cabinet potential. We want the RF transmitting shield connections between desktop gear to be as low as possible. To avoid ground loops, connect your ground wires in a star configuration to a single point on the ground bus, with wires as short as possible.
Proper Antenna Grounding Techniques: Different types of antennas require specific grounding techniques to ensure optimal performance. Here’s a breakdown of proper grounding techniques for common types of antennas:
- For vertical antennas, the ground connection is typically made using a ground radial system. Radials should be spread out horizontally and buried slightly underground. Try to use at least sixteen 1/4 wave radials. If you don’t have the space, lay down a larger number of 1/8 wave radials or whatever lengths will fit the available area. For elevated antenna installations, two 1/4 wavelengths opposite each other will give good results.
- Dipole antennas are typically grounded at the entrance point to your house, often with a lightning arrester attached to the SPGP.
- Typically, Yagis are supported by antenna towers, which should be grounded at each of the three legs with a ground rod. All these connections need to be bonded, along with the coax feedline shield at the base of the tower.
Second Floor Radio Installations: Sometimes a short ground lead is impossible, especially when your radios are on the second floor. Tom, W8JI, suggests that installing a ground plane at room level is the most practical way to minimize RF in the above-ground shack.
This ground system—which is really a counterpoise– can be strips of copper foil laid under the carpet or area rug, a screen, or grid of wires under the floor. Hobby suppliers sell copper foil tape that works very well. A grid of foil does not need to fill the entire space. Foil pieces one to two feet apart are nearly as good as a solid sheet. Connect these to the station equipment ground bus.
This counterpoise system makes the entire room, including the operator, “rise” in voltage to match the equipment chassis voltages. It also spreads the current and voltage around, reducing intensity of localized electric and magnetic fields. If you can’t do the floor counterpoise, sometimes a 1/4 wave counterpoise along the baseboard will work for the “problem” bands.
Lightning Striking Again?
There’s no such thing as guaranteed protection, but you can certainly improve your odds. We’ve just scratched the surface regarding grounding. For some additional information, be sure to consult H. Ward Silver’s Grounding and Bonding for the Radio Amateur 2nd Edition. It’s an excellent reference for hams who want to learn about the hows and whys of grounding techniques.
Safety Tip—Call Before You Dig.
Each state has a toll-free number to arrange locating and marking utilities. You really don’t want to find a buried pipe or electrical service when driving a ground rod. Most are completely free, although it may take a few days to schedule a non-emergency visit. Call 811 to be connected with the service for your state or visit https://call811.com.