
First of all, congratulations on starting your first HF station! You will be joining a long tradition of Hams with roots in the spark era all the way through to the present day! You can use vintage gear or the latest transceiver—some tips and themes are common to a wide range of setups. This article will give you some advice to consider as your “shack” begins to take shape.
| In My Little Ham Shack Did you ever wonder where the term “radio shack” came from? Believe it or not, that was a literal description of many early wireless stations. The rotary spark gap transmitters were noisy and even dangerous, so they were banished from the house, business, or officer’s quarters! Finding a home in an unused garage, shed, or quickly crafted shelter, the term “shack” was quite descriptive and became the slang reference for all stations, no matter how neat and clean. |
Typical First Stations
Really—what’s the big deal? Radio is radio, right? A typical home VHF station includes a power supply, a mobile or base transceiver, a power meter, and maybe an antenna switch. Is so much different at HF? The equipment might not be, but the signals and techniques are definitely different. The antennas are definitely bigger since HF signal wavelengths can be 50% to 1,000% bigger!
Just like on VHF, there is a tremendous amount of variation in equipment size and shape. Let’s make some simplifying assumptions about your first station:
Transceiver: 100-watt output, 160 through 6 meters, all-mode (no amplifier just yet)
Power Supply: 25- to 30-amp, 12-volt supply running from 115 VAC
Antenna: Wire antennas and/or multi-band vertical
Computer: Desktop PC with several USB ports and a good-quality sound card
Accessories: External antenna tuner with built-in wattmeter; audio interface for digital modes; antenna switch and dummy load
Operating aids: Boom set (headphone-microphone combination); comfortable desk chair
I am also assuming that you live in a building that you have authorization to modify and can make all the necessary grounding connections for AC safety and lightning protection.
| Basic References for All Stations Two references that are a worthwhile addition to any station and especially for designing and building are the ARRL Handbook and the ARRL Antenna Book. They cover many topics with updates from acknowledged experts in the field. These are the “go to” guides and have been for many decades. You won’t regret having them on your new station’s bookshelf! |
Ergonomics
You’re going to be spending a lot of hours at the radio, so it’s important that you’re comfortable. Let’s say you decide to enter a weekend-long contest—you’ll spend as many hours at the station as there are in a work week! Many of the same principles apply to amateur stations as to good workplace practices. Take care of your back, your butt, your eyes, and your arms and hands—you won’t regret it!
Tip: Before you start spending money or drilling holes, why not visit some other stations? You can try out various configurations and see how they feel to you. Plus, you’ll get plenty of ideas about arranging equipment.
Operating Table or Desk: The surface should be at a comfortable height of 28–30″. A minimum of 30″ surface depth is required for the equipment to fit. Some people prefer to have their keyboard be a few inches lower and that would require a drop shelf. The surface should be deep enough for you to have at least 12″ of arm rest in front of the radio’s tuning knob. You’ll be doing a lot more tuning on HF, so it’s important to reach the radio comfortably.
Tip: If your horizontal space is limited, move up! Instead of a table or large desk, consider office workstations with extra shelves. Just keep the radio and everything you will be manipulating close to desk level so you don’t have to reach too far for it.
Operator Chair: This may be one of your most important purchases! A good-quality, adjustable office chair is an excellent choice. It’s becoming increasingly common to use one of the popular “gaming” chairs designed for long periods of video gaming action. If you get a chair with arms, be sure you can remove them if necessary. A few different chair pads will give you a change-of-pace for more comfort.
Computer Monitor: The monitor should be right in front of you and at a height that doesn’t require looking too high or low, which causes neck pain. Place the monitor at a distance that won’t cause eye strain, and consider getting a pair of computer glasses if you wear spectacles. In most stations, the monitor is the thing you’ll look at most so make sure your eyes are comfortable, too!
Headphones and Microphone: Your radio will come with a hand mike but for long periods of operating, you’ll want to get a headset (also known as a “boom-set”) that combines the headphones and microphone. If at all possible, try out several models before making the purchase—don’t wind up with an uncomfortable pair of “cans”!
Good Practices
This section falls into the “I wish I’d thought of that before I…” category. The author has personally violated every one of these guidelines, so you don’t need to ask me how I know these things!
One thing that nobody ever regrets is building your station so you can easily get behind and under the equipment to work on it! That makes it so easy to manage your cables and ground connections, compared to reaching around and over equipment, or worse, having to sit under the desk and reach up and around the back. If you can’t see what you’re doing, it’s more likely you’ll make a mistake, too. Casters or wheels on your operating table or desk will let you move it for access to the back.
Put the ground system in first! Building a first station is exactly the right time to put in a ground plane and an RF bonding bus. This makes it much easier to deal with heavy wiring to your ground system. If you add shelves, put in the ground plane and connections before you put any equipment on them.
Leave a little extra cable length. While you want to keep cables reasonably short so they pick up a minimum of RF, resist the urge to cut them at exactly the “right” length; some day you will want to rearrange your equipment to different locations on the desk. Make or buy cables with different lengths to have on hand when you do need to re-cable a connection.
Use common, standard DC power cables and connectors. I’ve standardized on properly crimped Anderson Powerpole™ connectors. Even for “wall warts,” you can put a set of connectors on the cable to make everything interchangeable.
Shelves should be a lot sturdier than you think. Radios can be heavy! If you can’t put in “two-by” (1-1/2″ thick) shelves, plan for vertical supports between the shelves to hold them up. Otherwise you will wind up with a lot of saggy shelves that don’t look very good at all.
Extra space is a great thing to have available. If you can, set up your station with extra length to make it easy to expand. Get the next longest table or desk. Another option is to pick up a small rolling table or cart for equipment that doesn’t get used all the time or test equipment.
Along with extra space, think ahead and plan for your station to grow. If you have two antennas at the start, get a three- or four-position antenna switch. If you put in conduit or an access “hole” for cables, use the next largest diameter than currently needed, or install two entrances. Cap off an unused access or fill it with non-rusting stainless steel, copper, or brass wool or scrubbing pads to block rodents and larger insects.
Build your station adjacent to an exterior wall. That shortens all cables to the outside and simplifies construction of your single-point ground panel where surge protectors and lightning arrestors are mounted. It also keeps connections to any external ground rod as short as possible, which is important for low impedance.
Do a prototype first by using one of the many free software programs used for home design. Or make a scale “map” of the station with movable pieces of paper representing your equipment. You can move them around and make sure it all fits before doing any lifting or wiring.
| I Don’t Know Why They Call It Wireless! As your station grows, the number of cables and connectors will grow much faster than the number of gadgets. Use good-quality shielded cables for all audio and control signals and connect the shield to the outside of a grounded enclosure to avoid RF interference to or from your equipment. Provide strain relief for the smaller cables to avoid breakage. When you install a piece of equipment, label each non-obvious cable to avoid confusion and incorrect connections in the future. |
Finally, remember as you go forward that everybody rebuilds their station more than once. Your operating tastes will change, your equipment will change, and so will your station preferences. Those “built in” stations look wonderful in the photos, but they are awfully hard to change!
Grounding, Bonding, Safety
No shortcuts here! If you are not comfortable that you know what you are doing with electrical power or grounding, get a reference book to guide you. The Complete Guide to Wiring is an inexpensive reference book available online or at home improvement stores. It covers a wide variety of common installation tasks and will help keep you out of trouble. The author’s Grounding and Bonding for the Radio Amateur brings a lot of information together about these important topics, defines terms, and gives suggestions for how to do it “right.” And don’t hesitate to get professional services when necessary!
Make sure from the very beginning that all of your equipment is properly grounded for AC safety and lightning protection. This is the time to be sure you have good connections to your home’s ground. When you install an external ground rod and a single-point ground panel, be sure all of your home’s external ground rods are bonded securely together.
You won’t regret running a dedicated branch circuit to power your station with a GFCI breaker. A dedicated 240 VAC circuit will allow you to install an amplifier someday. Build or purchase high-quality AC power distribution strips—trust me, you will need way more outlets than you think!
Tip: If your equipment will include a high-voltage power supply or tube equipment, it’s a good idea to have a master switch near your station. Show your family and friends how to disconnect the power in case of an emergency.
Learn the difference between grounding and bonding. Plan to bond all of your equipment together by using heavy wire or copper strap. (That box of Romex scrap is full of excellent wire for grounding and bonding.) An RF bonding bus at the back of your equipment with plenty of attachment screws makes this easy. Install a ground plane, such as this one from DX Engineering, under your equipment if possible. A metal operating table or desk also works well for this purpose.
Antenna Systems
Next to operator skill, the antenna system of an HF station is probably the most important factor in performance. There is no bigger bang for the Ham’s buck than antenna system quality. By “system,” I mean everything from the back of the radio to the radiating element. Signals lost here cannot be made up elsewhere. I usually counsel Hams new to HF to spend at least one-third of their budget on the antenna system, even trading off transceiver performance in favor of better antennas.
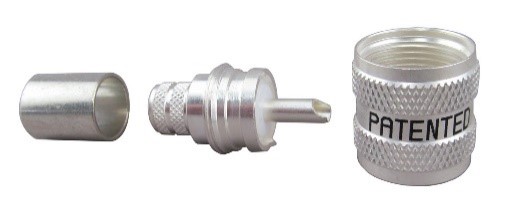
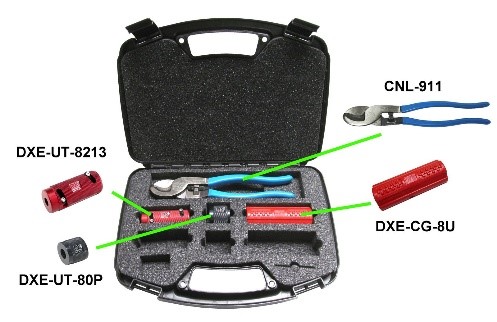
Let’s start with the feed line. Most new HF station builders will use coaxial cable—don’t scrimp on either the cable or the connectors. Assuming a fixed station, use a cable like RG-213 or DXE-400MAX, even if you are running low power. If you use parallel conductor feed line, get the type with the largest conductors. The lower losses do make a difference! Same with connectors—get high quality connectors and install them properly with the right soldering or crimping tools. If you don’t already have a set of connector installation tools, it’s worth investing in a set. You’ll save the cost of ruined connectors and poor connections many times over. If you aren’t comfortable installing connectors, buy professionally-made cable assemblies from a reliable vendor you can trust with those precious signals!
At HF, those bigger antennas are more exposed to lightning and static, so build a sturdy entry panel that is bonded to a good ground system (see Grounding and Bonding for the Radio Amateur for a more complete discussion). When you build the entry panel for your antenna feed lines, make it bigger than you think you need. That will make it easier to work on, and you will have plenty of room for expansion. The feed line lightning protectors should mount securely to the entry panel.
Tip: Be aware that some models of lightning protectors block DC and others pass DC. If you plan on using a remote antenna switch or tuner, you’ll need protectors that pass DC.
If you buy a commercial antenna, follow the assembly and installation instructions exactly. Use anti-oxidation compound on non-soldered connections. If you buy a used antenna, disassemble and clean it thoroughly first. Replace any rusted or corroded hardware with galvanized or stainless steel. For ground-mounted, ground-plane antennas, your radial system has a lot to do with how well your antenna will perform. Install a minimum of 16 radials that are approximately one-quarter wavelength long at the lowest frequency of operation. (They are not “tuned” to resonance: one-quarter wavelength is a rule-of-thumb for the point of diminishing returns.) K3LC wrote this National Contest Journal article on getting the most out of a fixed length of wire for radials.
Finally, learn how to waterproof RF connectors the right way as described in the ARRL Handbook and ARRL Antenna Book. A well-wrapped connection, using high-quality electrical tape like Scotch 33+ or Scotch 88+ and a vapor barrier of self-vulcanizing butyl rubber will last for years. Avoid silicone sealants unless the connection is intended to be permanent.
Last Words of Advice
Take it from someone who has built a number of stations—large and small, fixed and mobile, permanent and temporary—take your time and try to do things right the first time. This is supposed to be fun, so don’t waste your time and money in ways that will make you unhappy and frustrated later. Don’t be afraid to ask for help and advice, either. You don’t have to do this alone. Take advantage of the skills and experience your Ham friends will offer. And last but not least, don’t compromise safety—it’s not a race. We’d like to see you as a happy Ham for many years of enjoyment, service, and satisfaction!