
Mother Nature must like Ham operators. We’ve been provided with an abundance of tall, non-conductive antenna supports—aka trees—which grow and flourish on their own. When it comes to wire antennas, all many of us have to do is step outside and decide which trees can be easily pressed into service.
Hams who don’t have suitable trees can still build their antenna farm from the ground up. A relatively small open area can host a vertical antenna with great DX potential.
Once you’ve decided which antenna is most suitable for your location, the next step is getting it in the air with the least amount of time and frustration. Here are some tips for getting your end-fed, dipole, or vertical in and on the air.
One, Two, Tree
Dipoles are the most economical antennas and deliver the most bang for the buck. However, getting them in the air is the challenge. My personal preference is to do installations in the spring or fall when the leaves are gone and you can actually see your installation clearly. I’m an inverted V advocate, preferring to use a single support at the center of the antenna as opposed to suspending each end from a different tree. We could spend hours arguing about the merits of the inverted V versus the horizontal dipole, but the installation process is basically the same.
I launch a lightweight pull string (10-15# monofilament fishing line on a reel) with a weight on the end over the tree. The idea is that the pull string catches a decent limb and the weighted end drops down to the ground. If the weight stops somewhere along its descent, tugging the launch end of the pull string a few times usually frees the weight to drop back down to the ground, where you can grab it.
What do you use for the actual launch? Do a Google search and you’ll find dozens of pneumatic antenna launchers available. Easy Hang Square Shot Kits available from DX Engineering include a slingshot, weights, a reel with monofilament line, and hoisting line.
You can also use a bow and arrow. It’s mostly accurate, but use extreme caution and careful aim as not to endanger others.
Take a trip to the pet store and you’ll find a variety of ball launchers suitable for an antenna setup. My new favorite for tall trees is a dummy launcher, which uses .22 caliber blank power loads to propel a retrieving dummy intended for hunting dogs. It works well for antenna placement as its velocity will allow you to use heavier nylon hoisting line, skipping the monofilament line step.
After a successful pull string launch, step two is to pull a hoisting line of 1/16 to 1/8 inch nylon twine back through the tree. I use fluorescent-colored mason’s line that is easy to see.
The last step is to pull your permanent antenna support line back through the tree. Antenna support lines of 3/32 inch Dacron from Synthetic Textile Industries (STI) are sufficient for short dipoles; longer antennas should have at least 3/16 inch Dacron support line.
Next, attach your support line to the antenna and raise the center or one end of the dipole. Your dipole should already be preassembled, including center insulator/balun, feedline, end insulators, and end lead ropes. Once the end of the dipole is up in the air, tie off the end rope around something low like a tree limb or a screw eye installed into the trunk. You can also wrap it around the trunk and tie. Make sure there is more than 2x the length of extra rope in the event you need to lower the antenna. Repeat as necessary for the other end. If you do an inverted V, find two convenient tie-off points or set up two 8-10 foot supports for the ends.
During storms and winds, trees will sway and put stress on the antenna and support ropes. Add door extension springs or UV-rated bungee cords near the end of the support rope to act as a shock absorber.
A Second Line
Trees have a tendency to grow around antenna ropes after a few years, locking them in place. For each support point, you may want two sets of rope and a pulley to avoid this problem. Use the line that goes over the limb described above as a hoisting line. On this line, you’ll hang a pulley through which you’ll run the second line which becomes the antenna support, making it easier to raise and lower. It’s easier to show than explain, so see the photo below.
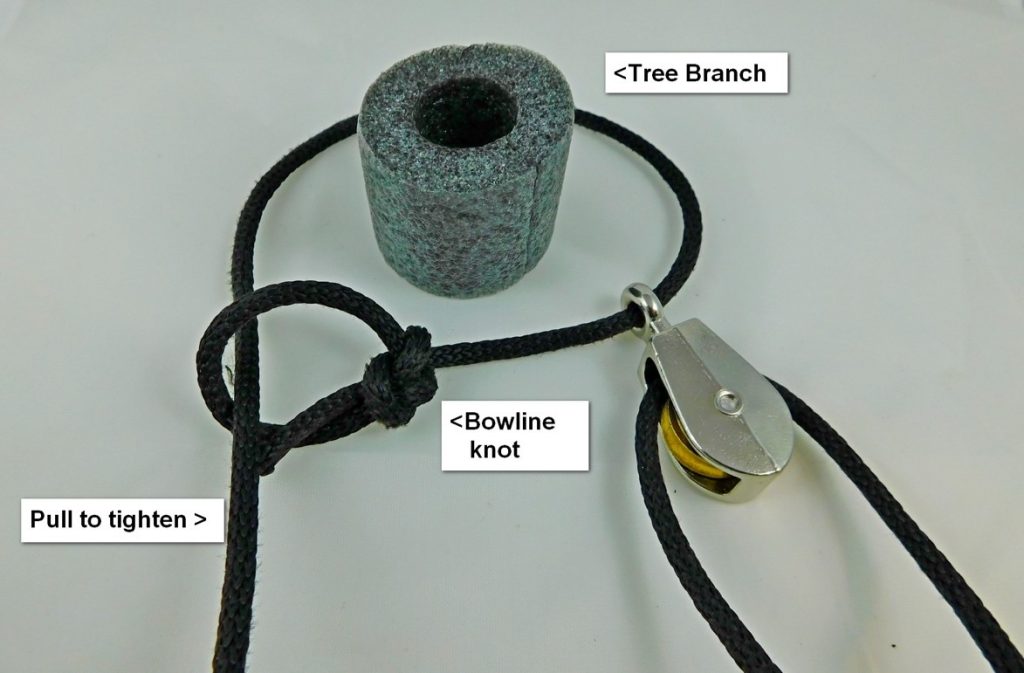
Thread the pulley onto one end of the line that goes over the branch (represented by foam sleeve). Tie a bowline knot in front of the pulley as shown in the photo and run the other line through the loop created by the bowline. Place the second line through the pulley and tie off both ends so it doesn’t come out of the pulley. Take the line going through the loop and pull until the pulley is tight against the branch. Tie off the rope, raising the pulley into the tree.
Cool Tool
Another useful tool is an MFJ lightweight telescoping fiberglass mast with a J-hook PVC pipe hanger attached. It’s helpful for pulling wires around branches or retrieving a stubborn rope or weight that may be caught in the tree. It can also double as a temporary antenna support for portable operation or Field Day.
Installing Vertical Antennas
The conventional vertical antenna is installed at ground level, making it easier to set up, tune, and maintain. You don’t have to play Robin Hood or shoot weights into a tree.
Most vertical antenna installations start with a steel mounting pipe to make a rock-solid base. A standard 1-1/2 inch galvanized water pipe works and can usually be found at your local home building supply store. The pipe needs to be a minimum of 4 feet long, which will allow approximately 2 feet or more to be below ground and 2 feet above ground. In cold climates, consider going deeper to the frost line.
Safety first! Before you settle on a location, be sure your antenna is far enough from overhead power lines so the antenna cannot come in contact with them if it falls.
For permanent mounting, use a posthole digger to make the hole deep enough to accommodate at least 2 feet of pipe. Add a couple inches of gravel at the bottom for drainage. Set the pipe on the gravel and use mixed concrete to fill around the pipe. Fill the hole until the concrete is level with the ground around it. Use a level as you fill the hole to be sure the pipe is straight. Brace the pipe as necessary to keep it in place until the concrete sets. When it’s set, attach the antenna according to instructions.
When you buy the antenna, consider getting a tilt mount as well. It will let you bring the antenna to ground level for maintenance and may save you the hassle of getting help to raise and lower the antenna. It also allows stealthy night operation to keep your HOA happy.
Dig a trench for your feedline. Choose a direct burial-rated cable such as DXE-213/U, DXE-400 MAX, or DXE-8X. Use 1½ inch PVC pipe and two 90 degree elbows to protect the coax as it emerges from the ground.
Ground-mounted verticals require radials. Check your installation instructions for the recommended length and number. The DX Engineering DXE RADP-3 radial plate and DXE-RADW-500K bulk radial wire kits are a convenient way to connect and lay out radials. Measure out your wire and hold it down with radial wire staples as close to the grass roots as possible. Give it a few weeks and the grass will grow right over the wires, making them disappear from sight.
As a finishing touch, you may want to use some landscaping edging or pavers around the perimeter of the antenna and radials. Putting landscaping cloth under the antenna and radial plate, along with some gravel, will help control weeds.