
Editor’s Note: Troy Blair, KE8DRR, DX Engineering customer/technical support specialist, enjoys sharing personal stories about his involvement in amateur radio so others can learn from his experiences in the true spirit of being an Elmer. Check out Troy’s other articles, “Serving the Needs of Others Through Ham Radio” and “Transitioning to HF Portable Ham Radio Operations.” Look for more posts from Troy in the days ahead.
I was really beginning to enjoy this hobby. I could combine my passion for public service with my interest in amateur radio. The specific area that truly intrigued me was Field Expedient Communications. I define “field expedient” like this: The ability to rapidly move to a remote area and set up reliable multi-band, multi-mode communications in very short order.
I realize there is more to it than that, but I am a simple man and subscribe to the KISS philosophy. I have friends who are engineers, and it is a running joke with us. I will often stop them amid an explanation and remind them, “I asked you what time it is, not how to build a watch!” I honestly believe the reason I have had such success with portable operations is because I keep it simple.
I am going to lay out the equipment I chose for my kit. Keep in mind, this is what I chose, not what everyone should choose. I’m merely sharing my experience, not looking to debate one piece of equipment over the other.
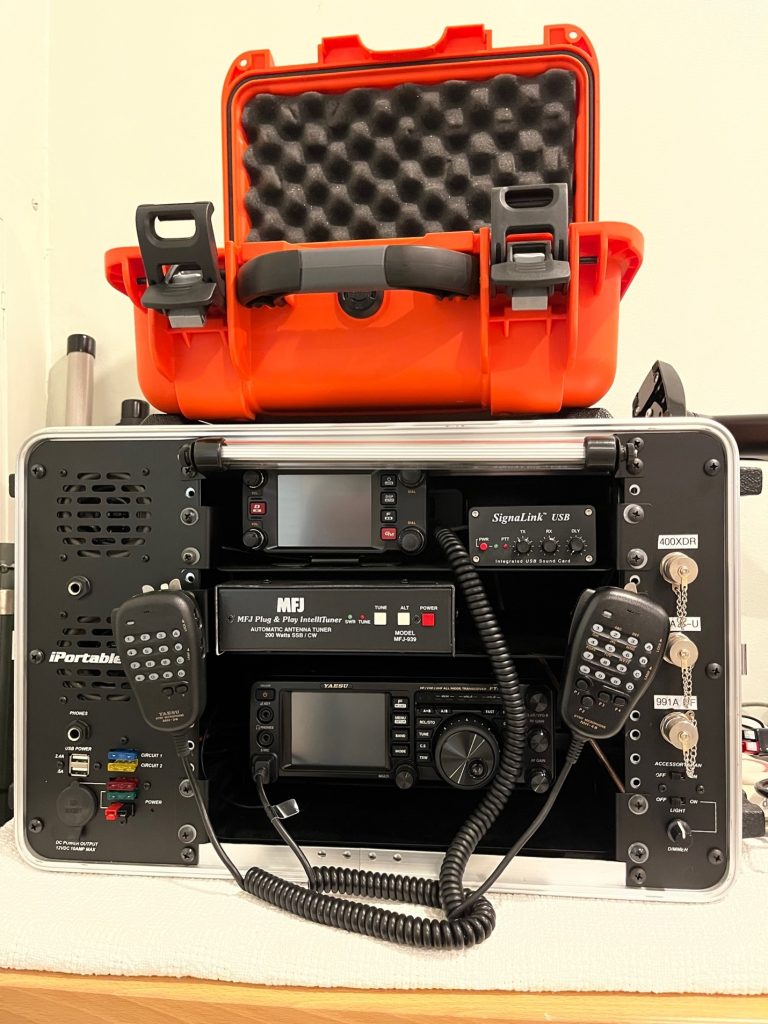
RADIOS: I wanted to have multi-band, multi-mode capabilities contained in a single unit for easy “grab and go.” I chose the iPortable enclosure to house everything. It is prewired and comes with speakers, headphone jacks, lighting, and charging ports. I use it as packaged with one additional shelf.
As I begin talking about my transceiver choices, please know that I am a Yaesu fan. I like the form, fit, and function of their radios. Also note that I receive no considerations or compensation for using their products.
For HF, I chose the Yaesu FT-991A. It has a nice compact footprint, conserving space in the enclosure while providing HF, 6m, 2m, and 70cm coverage. It also has the Yaesu C4FM digital platform built in with access to WiresX. The FT-991A uses a built-in audio interface for direct connect to a computer for digital mode communications. Although it has a built-in antenna tuner, I opted to install an MFJ-939Y Automatic Antenna Tuner to allow for a wider range of antenna scenarios. Portable operations do not always present the best antenna situations.
For 2m and 70cm, I opted for the Yaesu FTM-400XDR. This radio has a large screen with onboard GPS as well as C4FM with access to WiresX. I included a Tigertronics SignaLink USB audio interface in the chance I would need to connect the radio to a computer for messaging.
ANTENNAS: For HF operation, I use a 31-foot telescopic vertical model. It comes with a tripod mount and includes three ground rods that double as anchor rods for the tripod. I purchased an optional extended trailer hitch mount. My typical deployment of this antenna is to put the hitch mount in the trailer hitch of my Jeep, affix the antenna, and attach the ground clamp from the trailer hitch mount to the vehicle’s tailpipe. The antenna requires the use of a broad band tuner, but it is extremely effective.
For 2m and 70cm on both radios, I use rollup J poles. These are extremely compact and lightweight yet very effective. I elevate them using MFJ-1916 telescopic masts. I find these masts, with a few elastic cords, work well as makeshift antennas. I can strap them to a fence post, a support on a park pavilion, or most any place I can get a strap around.
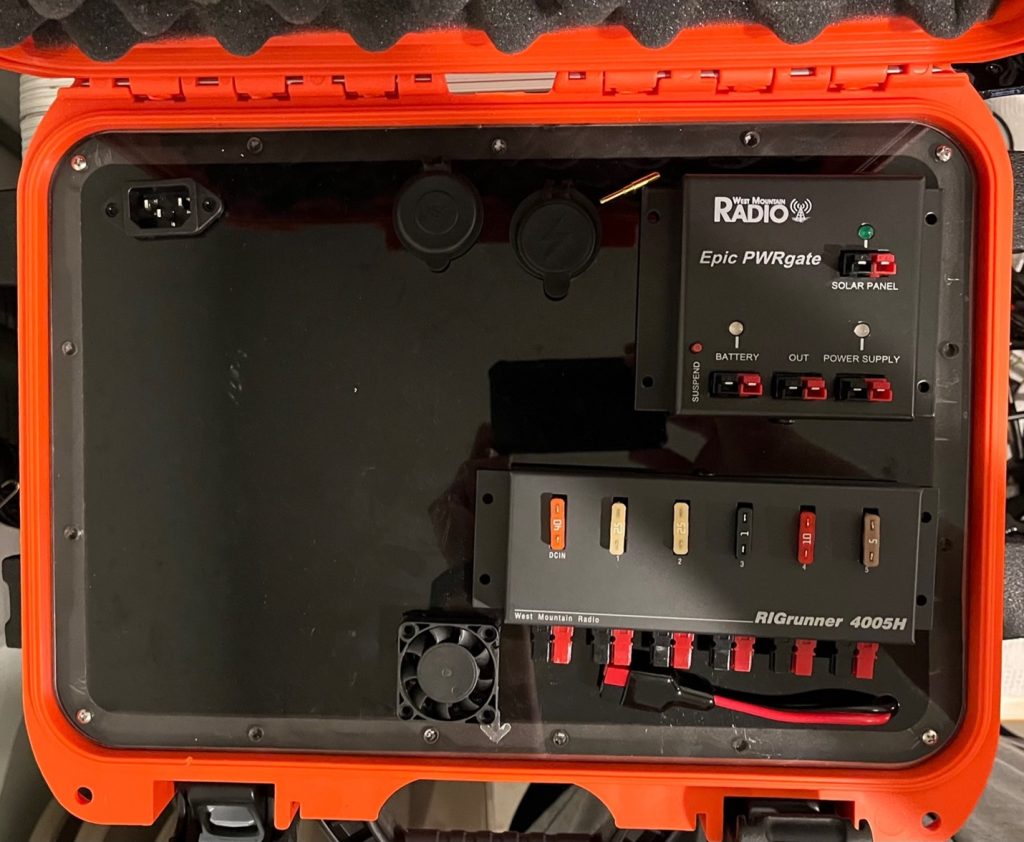
POWER: This one took some time to figure out. I used a Nanuk 915 case as the housing for my power box and ordered the mating Lexan cover that is predrilled to mount over the bottom section of the case. Velcroed to the bottom of the case I have a Samlex 1235 power supply and a Bioenno 20aH LiFePo battery. Mounted on the Lexan are the following:
- West Mountain Radio Epic PWRgate Battery Backup System
- West Mountain Radio RIGrunner DC Outlet Panel
- Anderson Power Pole adapters for the power supply and battery
- Dual USB charging port
- Small fan for heat removal
The battery, power supply, and RIGrunner plug into the Epic PWRgate. Additionally, I use a Dokio 110W foldable solar panel. It should be noted that the included charge controller is not used with the Epic PWRgate, and the Epic PWRgate must have jumpers set for your battery chemistry. The solar panel also plugs into the Epic PWRgate.
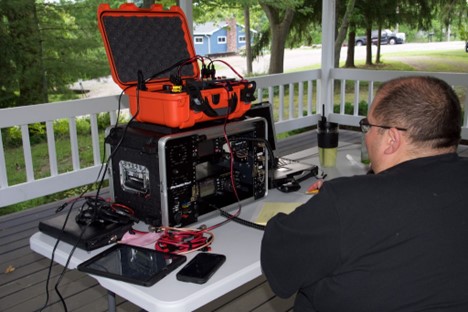
Miscellaneous: There are a few other things that I consider to be mission critical. First, I use a Microsoft Surface Pro laptop for logging, CAT, and messaging. I originally used the Panasonic Tough Book, but it is very heavy and bulky with a small screen. However, the Panasonic does offer a few nice features. The screen can be viewed in direct sunlight, and it has a modular design to help meet different needs. I just found that the portability of the Surface was more useful for most applications. Don’t forget pen and paper in case of electronic failure.
I use a Heil BM-17 headset when portable. It is lightweight and stows nicely, and I continually get good sound quality reports with it.
I also carry a folding poly-molded table to hold all these items and keep them at my fingertips while I am working, along with a folding camp chair to help with my aging back. Both are lightweight and don’t take up much space in the Jeep.
I now have a system that allows me to be operational in 15 to 30 minutes from the time I pull up to an incident command post. I cannot stress enough the need to not only build the gear, but practice with it. Typically, in a month with no planned exercise, I will set it up and conduct an ARES net from the go gear.
Now that the portable gear was assembled, there was a whole new world out there. I’d been hearing a lot about ILLW (International Lighthouse, Lightship Weekend) and all kinds of other portable acronym events. What could I get into now? To find out, read my next post on my experiences with POTA (Parks on the Air) activations.